Vapor Chamber Cooling Design Guide
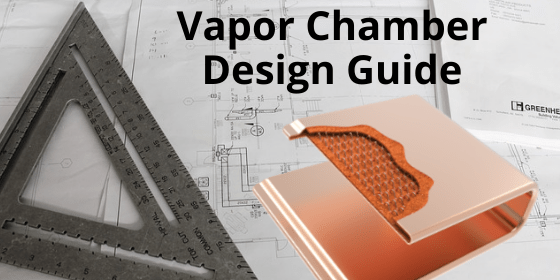
Vapor Chamber Cooling Design Guide
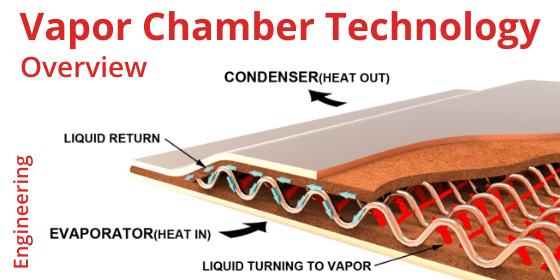
Electronics cooling using a vapor chamber is a fairly common design choice. This vapor chamber design guide is for the most prevalent types of applications: CPU/ASIC to amplifier applications with power ranging from around 20-250 watts, power density greater than 20 W/cm2, and heat source sizes of between 10-30mm square. The focus is on vapor chamber cooling using a copper envelope with sintered copper wick and water as the working fluid. The following topics are covered in this guide.
- Vapor Chamber Cooling Design Parameters
- Vapor Chamber vs Heat Pipe
- Types of Vapor Chamber Design
- Vapor Chamber Usage Guide
- Vapor Chamber Thermal Conductivity & Performance
- Vapor Chamber Heat Sink Integration
- Dimensional Design Limits of Vapor Chambers
Vapor Chamber Cooling | Design Parameters
Cooling electronics using vapor chambers are subject to the following guidelines:
Power Handling Capacity
Vapor chambers can have the same power handling capacity as multiple heat pipes; from a few watts to over a kilowatt. However, if one heat pipe can meet thermal and physical requirements, it’s probably cheaper to use them – depending on post-production operations like machining. That’s why a move to vapor chambers from heat pipes usually involves applications with higher power and/or higher power densities. Anything less and heat pipes may suffice.
Power Density Capacity
Vapor chambers are particularly well suited for electronics cooling applications where power density is high – roughly above 20 W/cm2 yet below 500 W/cm2. In these situations, it’s usually critical that heat is spread quickly to a larger surface area.
Shapes & Dimensions
The traditional method for producing vapor chambers begins with two stamped plates, mirror images of each other, that eventually get diffusion bonded together. This gives the designer enormous leeway in the X and Y dimensions. Length and width max dimensions are governed by press and furnace size as well as application requirements. Consequently, you typically don’t find vapor chambers in excess of around 300 x 400mm.
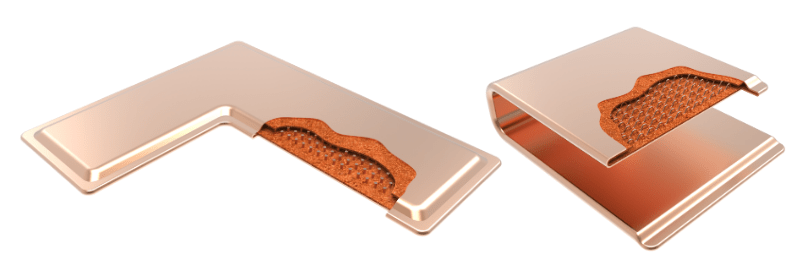
Traditional Vapor Chamber | 1-Piece Bendable Vapor Chamber
A few manufacturers also have the capability to produce vapor chambers that start as a very large copper tube (25-70 mm diameter) which is sintered, flattened, and has an internal support structure added to it. We call these 1-piece vapor chambers. The main advantages are cost and the ability to be shaped into L and U configuration. The drawback is they can only be produced in rectangular shapes. Dimensional limits due to manufacturing capability for these typically range in the 100mm wide to 300mm length.
Both types of vapor chambers, particularly when designed with a sintered wick structure, are between 2.5-4mm thick depending on the power to be moved or spread.
Bending
Two-piece vapor chambers made of two stamped plates are generally not bent post stamping. Any small ‘steps’ or bends are done as part of the stamping process. However, one-piece vapor chambers that start as a tube are bend post-production in the factory. While band radius changes somewhat depending on vapor chamber width, thickness and location of the bend, a typical bend radius is on the order of 7mm for smaller vapor chambers to 12mm for large ones. For more information, see the last section of this article: vapor chamber dimensional design limits.
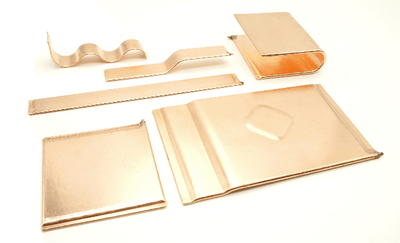
Vapor Chamber Shapes
Surface Flatness
Vapor chamber surface flatness is particularly important because, unlike heat pipes, they are designed to make direct contact with the heat source. Flatness is controlled in the component contact areas to a nominal flatness is .002”/1” but post-machining, while adding cost, can bring this down to 0.001”/1”. This is typically only necessary when mating to higher power density components with similar flatness for very thin bond line thickness and low interface resistances.
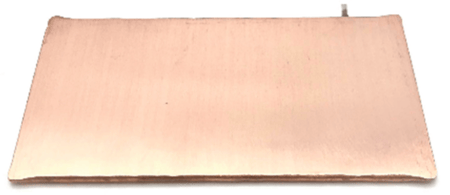
Machined Vapor Chamber
Resistance to Heat Loads
Without modifications, vapor chambers can withstand deformation to around 110 oC. For a copper water vapor chamber to handle higher temperatures, the wall thickness needs to be increased, additional internal support structures are added, and/or an exoskeleton (metal plate) is used on one side of the vapor chamber (the other side is supported by the base of the heat sink). For comparison, heat pipes with their inherently stronger geometry can handle upwards to 200 oC.
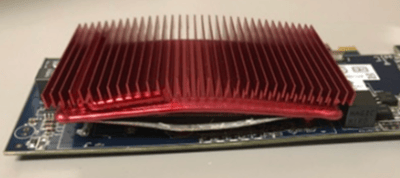
Warped Vapor Chamber Caused by Excess Heat Load
Clamping Pressure
Vapor chambers are hollow and require internal support to withstand clamping pressures. Standard designs use supports for up to 60psi of pressure before becoming deformed. However, they can be altered to support up to 90psi.
Surface Treatment
All copper parts are passivated to protect against short term discoloration. Nickel plating is the most common coating used for both heat pipes and vapor chambers for corrosion protection or cosmetic reasons.
Vapor Chamber vs Heat Pipe
Vapor chambers differ from heat pipes in several ways. First, they are more isothermal than either solid metal or heat pipe based solutions. This allows a more uniform temperature across the die face (reduced hot spots) as well a more uniform temperature across the entire face of the vapor chamber (lower delta-T).

Advantages of Vapor Chamber vs Heat Pipe
Second, heat sinks using a vapor chamber allow direct contact between the heat source and the device, reducing interface thermal resistance. Heat pipe solutions usually require an additional base plate and TIM layer.
Third, height constrained thermal solutions often benefit from vapor chambers because they a) make for a thinner base to which the fin stack is attached and/or b) allow for more fin area as heat pipes typically go through the center of the fin stack.
Types of Vapor Chambers
While everyone is familiar with a traditional vapor chamber that’s made from two stamped pieces of metal (2-piece design), there’s another method for producing these devices that offers some unique advantages.
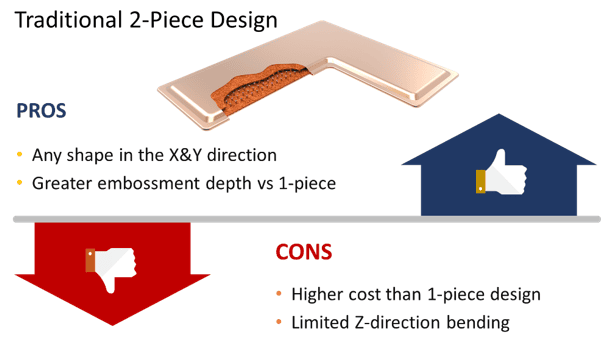
For shapes other than a rectangle, a 2-piece vapor chamber is needed because the stamped plates can be created in virtually any shape along the XY planes. Additionally, they’re able to have a higher embossment should the heat source be recessed. Unfortunately, they come at a slight cost premium over a 1-piece and cannot be bent post-production
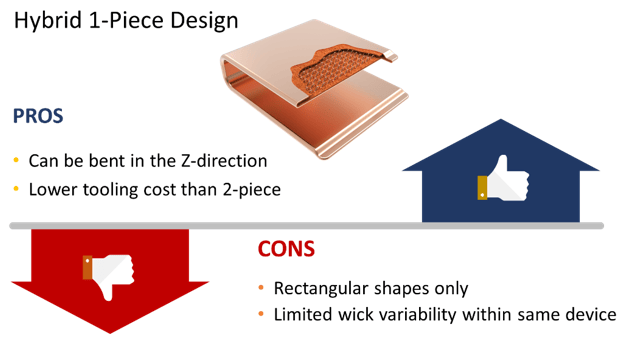
A handful of manufacturers are now producing a 1-piece vapor chamber – so named because it begins life as a very large single copper tube which is flattened and has a corrugated spacer inserted for structural purposes. While its shape is limited to a rectangle, it can be bend in the Z-direction forming steps, L-shapes or U-shapes.
Vapor Chamber Usage Guidelines
Use a vapor chamber when the heat sink design is conduction limited and here are a few simple rules, followed by some links to online calculators, that will help determine if a vapor chamber is a good solution. Here are some simple rules of thumb to remember:
Use Vapor Chambers When the Thermal Budget is Tight
The thermal budget is simply the maximum ambient temperature at which the end product will operate minus the maximum temperature of the component Tcase. For many outdoor or rugged applications, thermal budgets can be well below 40oC.
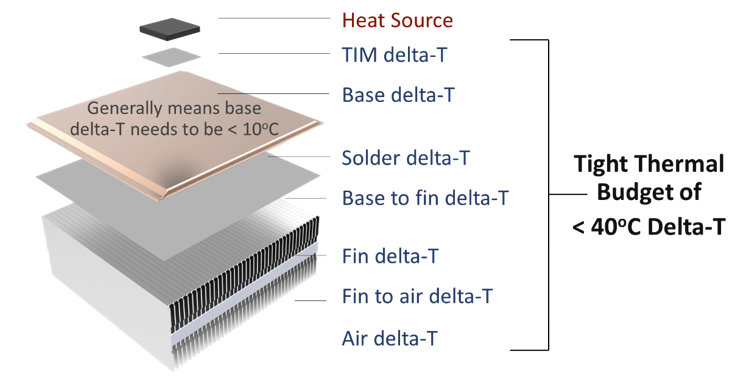
Sum of the Delta-Ts Must be Below the Thermal Budget
That means that the sum of all individual delta-Ts (from TIM to Air) must be lower than the calculated thermal budget. For typical applications in this category, we generally need the delta-T of the heat sink base to be 10oC or less. Visit our online calculator to see the difference in heat sink delta-Ts for your application.
Use Celsia’s online heat sink calculators to help determine if a vapor chamber should be used in place of an aluminum or copper base.
- Estimate Required Heat Sink Size: This calculator quickly estimates the total volume of the heat sink which gives you a rough idea of its required dimensions. See the use-instructions and the heat sink size calculator.
- Compare Vapor Chamber Base to Solid Metal: This calculator shows each of the delta-T’s in a heat sink assembly and compares heat sinks with a vapor chamber base to those with a solid aluminum or copper base. See the vapor chamber vs metal base heat sink calculator and corresponding use-instructions.
When the Ratio of Vapor Chamber to Evaporator Area is >10:1
Like heat pipes, vapor chamber thermal conductivity increases with length. This means that a vapor chamber the same size as the heat source will offer little advantage over a solid piece of copper. A good rule of thumb says that the area of the vapor chamber should be equal to or greater than 10X the area of the heat source. In situations where the thermal budget is large or when a lot of airflow drives a small fin stack this may not be an issue. However, it’s often the case that the base of the sink needs to be considerably larger than the heat source.

As this Ratio is Reduced, Solid Copper Becomes an Option
Use a Vapor Chamber When the Primary Goal is to Spread Heat
While vapor chambers can sometimes be used to move heat to a remote heat sink, we most often see vapor chambers used to spread heat to a local heat sink. Heat pipes are ideal for connecting the heat source to a remote fin stack especially as this often involves a series of twists and turns.
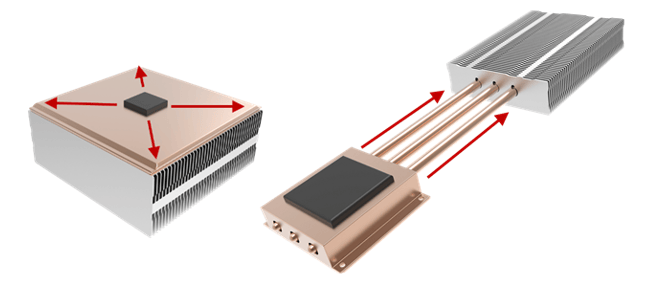
Vapor Chambers Spread Heat | Heat Pipes Move Heat
Vapor Chamber Thermal Conductivity & Performance
When looking at the effective thermal conductivities of heat pipes and vapor chambers it appears that vapor chambers have lower thermal resistances than heat pipes do. This is due to the substantial cross-sectional area that vapor chambers have when compared to typical heat pipes. The average 6mm heat pipe has a cross-section of 28mm2 while even a small vapor chamber, 3mm x 40mm, has a cross-section of 120mm2 (dT = Q*L/(k*A).
If transporting the same power then the effective thermal conductivity goes down by the ratio of the cross-sections. A key point to remember is that although the VC has a lower effective conductivity, they offer performance advantages such as higher total capacities, better operation against gravity, direct contact to the heat source and somewhat lower delta-ts.
Vapor Chamber Heat Sink Integration
Vapor chambers can be attached to any kind of heat sink (extruded, skived, etc) but most often they are paired with zipper fins, also known as fin packs, or machined heat sinks. There are two reasons for this. First, both of these heat sinks have very good thermal performance; zipper fins due to the ability to have very thin, closely spaced fins, and machined due to virtually infinite geometrical design options. Sometimes we see them successfully paired with die-cast housings with integrated fins used in extreme environments.

From Left: Zipper Fin Heat Sink, Machined Heat Sink, Die-Cast Heat Sink
Regardless of heat sink type, vapor chambers must be attached to the base/fins. They are soldered (most common) or epoxied to the base of the fin stack, the former having better thermal conductivity. Solders used for these assemblies have thermal conductivities on the order of 20 to 50 W/mK while epoxies are on the order of 1/10th of solder conductivities which makes them only useful for low power density applications <10 W/cm2.
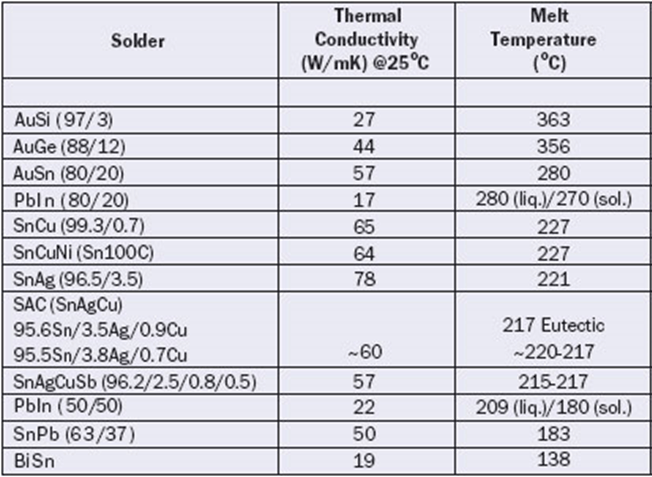
Solder Thermal Conductivity & Melt Temperature
Soldering takes place at temperatures generally above the max temp for vapor chambers so special care must be taken in designing solder fixtures. These fixtures must be able to withstand the internal pressures generated in the vapor chamber during the soldering process to prevent vapor chamber deformation. The pressure chart below indicates the internal vapor chamber pressures vs temperature.
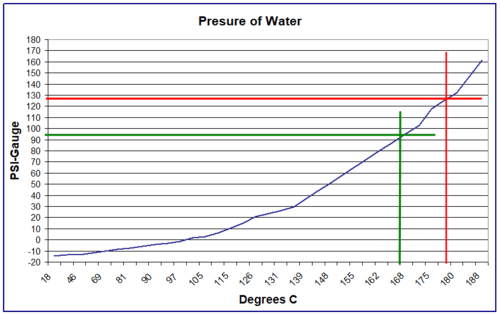
Vapor Chamber Temperature Vs. Internal Presure
The solder fixture (shown below in purple) is designed to conform to that of the heat sink assembly, preventing it from deforming during the soldering process. The upper and lower portions are clamped or bolted together to prevent the vapor chamber from expanding.
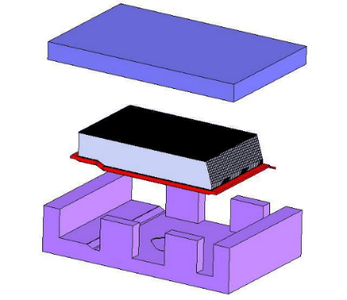
Solder Fixture (Purple)
Celsia Vapor Chamber Dimensional Design Limits
The table below lists the specifications and tolerances for 1-piece vapor chambers. Because these vapor chambers begin as a very large tube, diameter is listed first followed by widths at various thicknesses as well as tolerances. No table is provided for 2-piece vapor chambers as they can assume so many configurations although similar tolerances apply. With regard to Celsia’s 2-piece capabilities, 300 x 300mm is the largest possible form factor while sizes of roughly 75 x 150mm are the most common.

Vapor Chamber Specifications

