Types of Heat Pipes

Types of Heat Pipes

This article explores the design and best uses of different types of heat pipes used for electronics cooling. These include:

  1. Standard Heat Pipes & Vapor Chambers
  2. Variable Conductance Heat Pipes (VCHP)
  3. Thermosyphon & Loop Thermosyphon
  4. Loop Heat Pipes
  5. Rotating Heat Pipes
  6. Oscillating / Pulsating Heat Pipes


Standard Heat Pipes | Vapor Chambers

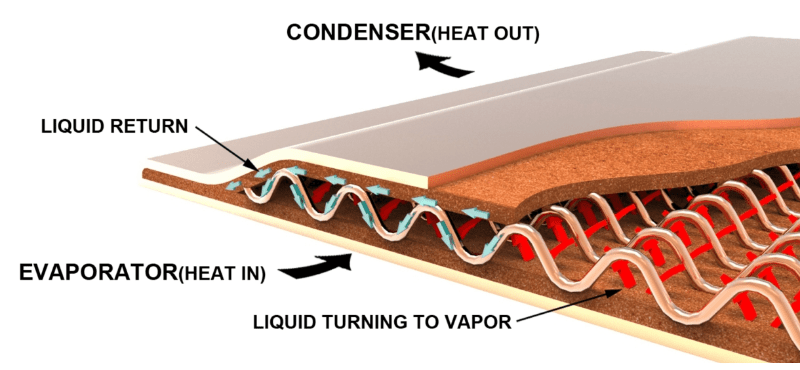
Constant conductance heat pipes (standard or CCHP) and vapor chambers are by far the most prevalent type of heat pipe used for cooling electronics.  As Celsia has numerous website pages on this subject (see below), we won’t do a deep dive here. However, we’ll use this definition of a standard heat pipe when comparing them to other types: a copper enclosure with a copper sintered wick structure attached to the entirety of the inner walls of the device and a small amount of water as the working fluid.

Diagram showing how a heat pipe works

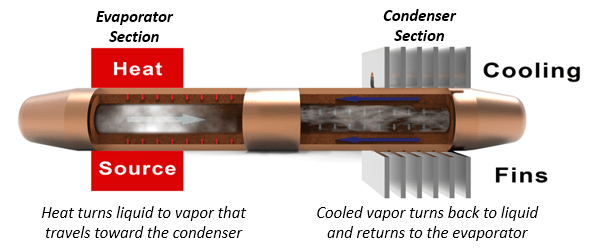
Standard Heat Pipe Inner Workings


As with many of the other types of heat pipes, standard heat pipes can be made of different envelope materials, use different wick structures, and have alternative working fluids. However, these subjects are beyond the scope of this article.

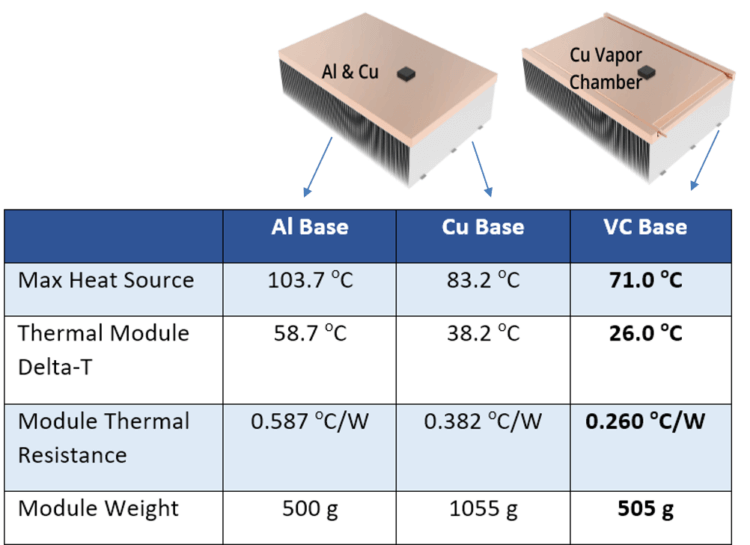
Vapor chambers are the first type of heat pipe variation. While it’s true that the most used vapor chambers closely mimic their heat pipe cousins (copper enclosure, sintered wick, water working fluid) they are designed to function as a planar heat spreading device and need a support structure to ensure adequate vapor flow and for structural integrity under clamping loads. Heat pipes can be flattened to a width-to-height aspect ratio on the order of 4:1 while vapor chambers achieve up to 60:1 aspect ratio. This design makes them a much better heat spreader and perfect for applications where a high degree of isothermality is required.

Graphic - How to Vapor Chambers Work

Vapor Chamber Working Principles


Variants on vapor chambers include 2-piece and 1-piece construction. The first uses a traditional manufacturing method where two stamped copper plates are bonded together, complete with wick structure, working fluid, and the addition of a support structure. A 1-piece design begins life as a very large tube (up to 70mm diameter), that’s sintered then flattened after a support structure is added. Benefits of this design include lower cost and the ability to be bent into ‘L’ and ‘U’ shapes. Here are some useful vapor chamber links:

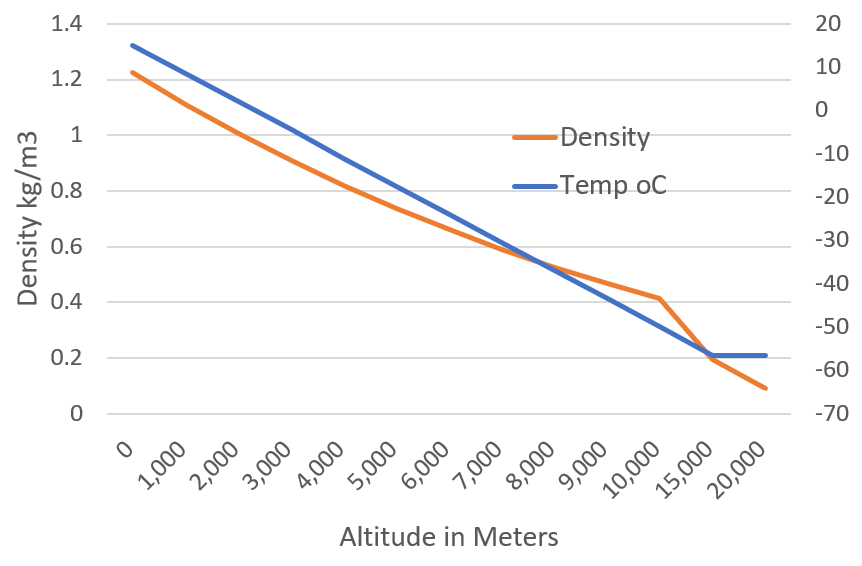
All heat pipe variations discussed below share a few common characteristics: they use a working fluid that’s matched to the environmental operating conditions of the application, the enclosure of the ‘heat pipe’ can be made from a variety of materials but must be compatible with the working fluid, and the device is evacuated to form a vacuum allowing the working fluid to vaporize at temperatures below what would be required if at atmospheric pressure. In short, all variants are two-phase devices.


Variable Conductance Heat Pipes

In contrast to standard heat pipes or vapor chambers (constant conductance devices), variable conductance heat pipes (VCHP) minimize temperature swings at the evaporator, usually at the lower end of the operating temperature range. Based on the power input and/or changes to the ambient temperature the device uses a varying degree of the condenser fin area by limiting the vapor space inside the heat pipe.

Diagram showing how variable conduction heat pipes work

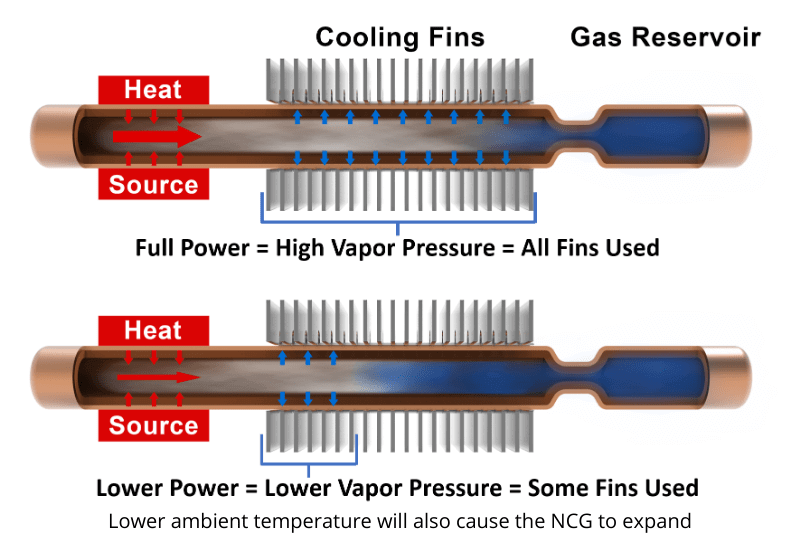
Variable Conductance Heat Pipe (VCHP)


In theory, it’s a remarkably simple execution. Adding a non-condensable gas (NCG), such as nitrogen or argon, to a standard heat pipe turns it into a variable conductance heat pipe. Here’s how it works. The heat pipe(s) and associated condenser (fin stack) must be designed to handle power and ambient temperature at the highest specification rating. In this instance we want the thermal solution to behave just as it would with a regular heat pipe configuration – with the working fluid vapor being able to reach the entire condenser length. Here, at the upper bounds of temperature, working fluid vapor pressure is high enough to push all the NCG to the extreme end of the heat pipe, beyond the condenser region. This allows heat to be expelled into the air using all the condenser fin area. In effect, forcing the heat sink to operate at its lowest thermal resistance.

However, when ambient temperature decreases and/or when the heat source is not at full duty cycle, the NCG expands to fill an increasing portion of the heat pipe vapor space. This prevents the lower pressure working fluid vapor from reaching some or most of the condenser fin area. The result is that the thermal solution now has a higher thermal resistance (less condenser area) so the evaporator stays warmer than it would if a standard heat pipe heat sink had been used.

In practice, these devices are extremely nuanced. As mentioned in the opening of this article, different envelopes, working fluid, and in this case, gas can be used to achieve specific results. Further, the area for the NCG can simply be at the end of a standard heat pipe (no reservoir), it can incorporate a reservoir (as shown above), or it can incorporate a flexible bladder system that expands and contracts.


Thermosiphon | Loop Thermosiphon

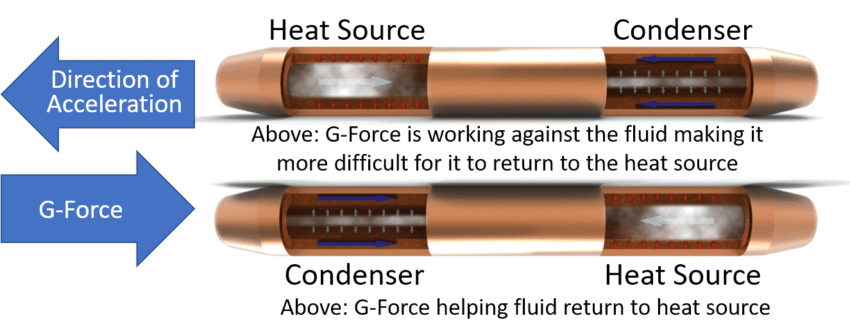
As a general rule, a thermosiphon is simply wickless heat pipes – although they sometimes include a grooved ‘wick’ that helps increase the surface area of the internal wall and allow liquid condensate to more easily return to the evaporator. Regardless, they must be used in an orientation that allows gravity to pull the liquid back to the heat source. In other words, the condenser must be above the evaporator.

Relative to standard heat pipes, thermosiphons can carry up to three times the heat transfer capacity (Qmax) for a given diameter pipe enabling a lower volume thermal solution. Further, thermosyphons can transport heat tens of meters as gravity is used for the liquid return. The functional limit for heat pipes working vertically against gravity is on the order of 150mm.

Diagram showing how thermosiphon heat pipes work

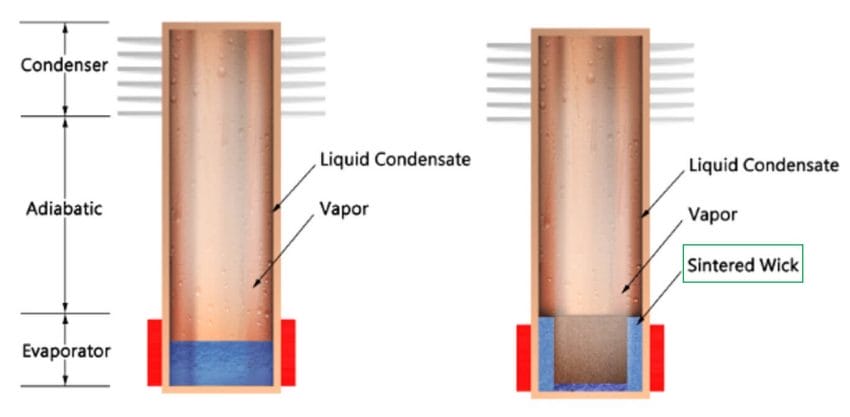
Wickless (L) and Partial Wick (R) Thermosyphons


Adding a sintered wick to the evaporator section lowers thermal resistance and increases the ability to handle higher power densities (shown above). It also allows optimization of the fluid charge, effectively reducing the required liquid. This all but eliminates the possibility of damage caused by freezing. In the figure above, note that the wick is only used at the evaporator section of the thermosyphon.

One of the limits is the interaction of the vapor and liquid condensate traveling in different directions (counter flow). To alleviate this problem, a loop thermosyphon design incorporates a separate vapor path and a liquid return path.

Diagram showing a loop thermosiphon heat pipe

Loop Thermosiphon


Loop thermosyphons do not necessarily need a wick at the evaporator. However, using a wick will lower evaporation resistance and increase the maximum power density. Also, a wick can reduce the possibility of structural damage when using water as working fluid because less water is needed.

For more information on these devices, please check out our Thermosyphon Technology Overview article.

Loop Heat Pipe

A loop heat pipe is similar to a loop thermosyphon but can operate against gravity with the evaporator above the condenser. Its operation depends on the ability of the working fluid to achieve high enough vapor pressure when heated to push the liquid condensate back to the evaporator section of the device. Unfortunately, this can’t usually be done with water as the working fluid. Instead, loop heat pipes use a refrigerant like ammonia where high pressure can be achieved at electronics operating temperatures. Typical operating temperatures for ammonia-based loop heat pipes are between -40 and 70 deg C. Generally, we see this type of device in space-related applications.
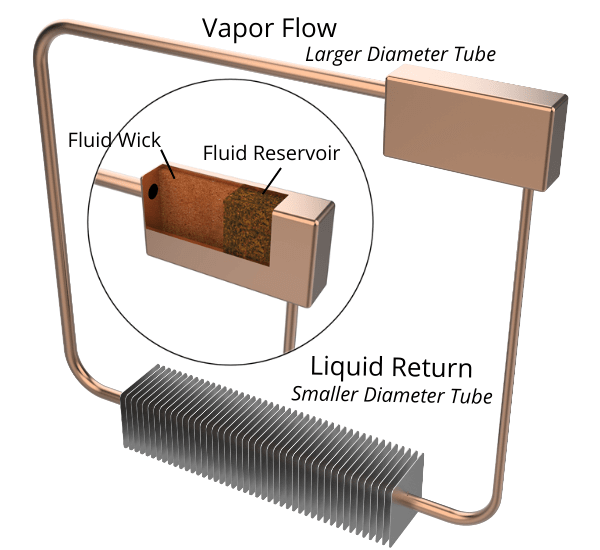
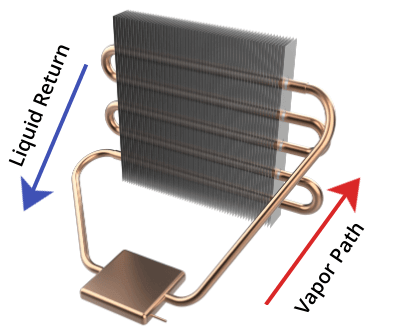
Diagram showing how a loop heat pipe works

Loop Heat Pipe


The image above illustrates a loop heat pipe along with an exploded view of the wick structure inside the rectangular reservoir. With the heat source located on the back, leftward side of the reservoir, the liquid ammonia turns to vapor. Because of the wicked liquid reservoir, vapor is prevented from escaping down the right-side tube and is forced into the horizontal tube to the left. After the condenser section, the tube narrows as the size required for the liquid is quite a bit smaller than required for the vapor. Since there is no wick structure inside the tube itself, the condensate relies on the vapor pressure behind it to push it up the tube where it can be reabsorbed by the wick structure in the reservoir.


Rotating Heat Pipes

Rotating heat pipes rely on rotational force to move the liquid back to the evaporator; two different designs are typical and are both incorporated into the image below. The first uses a wickless copper tube that has a thicker, tapered wall at the condenser end. When vapor turns to liquid condensate, the centrifugal force generated by the rotating pipe pushes the liquid back to the evaporator end. The second requires spiraled grooves (much like a rifle barrel) along the inside walls which are not tapered. For cost reasons, the latter is most often the best choice. Typically, rotating heat pipes are used to remove heat generated in motors and other rotating machinery such as RF rotary joints used in telecommunications.

Diagram showing how a rotating heat pipe works

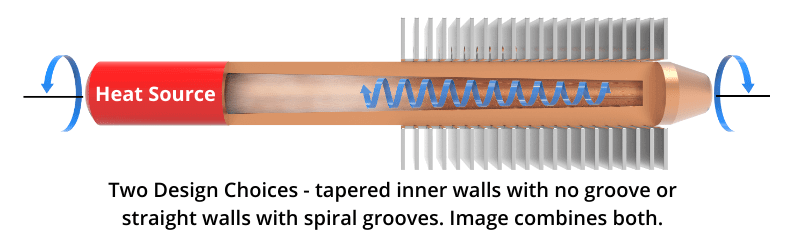
Rotating Heat Pipe. Two designs depicted in a single image.


Oscillating / Pulsating Heat Pipes

First created in the early 1990’s, oscillating heat pipes are the newest member of the two-phase family. Early versions of this device (not shown) were typically a planar rectangular shape that are comprised of a lower plate into which a series of interconnected pathways are machined, and smooth upper plate that gets bonded to the lower one, air and working fluid. They are so named because of the intermittent pockets of liquid and vapor that pulsate back and forth as they move to cooler areas.

Today, much of the research on oscillating heat pipes involves designs that resemble standard heat pipe assemblies. As seen in the figure below, a wickless closed-loop tube consisting of a series of U-shaped bends is embedded in the evaporator base and condenser fins. Tubes are usually charged with either water or ethanol to between 30-80% of their volume and evacuated. As the heat is applied, vapor bubbles form creating alternating slugs of vapor and water. Further heating expands the vapor slugs, pushing the slugs of water toward the condenser, much in the same way a coffee percolator works.

Diagram showing how an oscillating heat pipe works

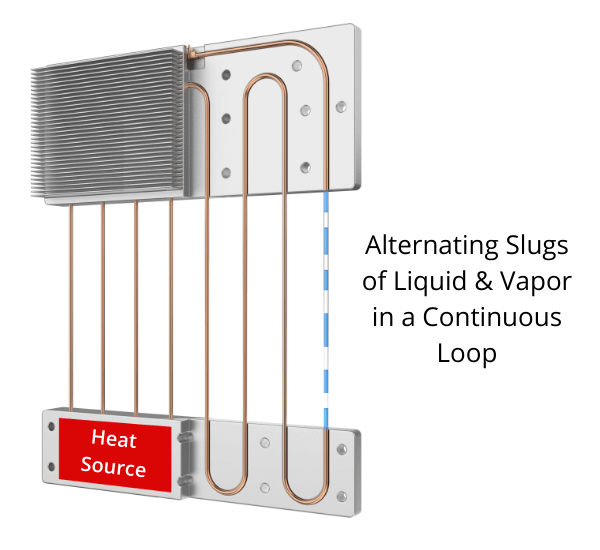
Oscillating Heat Pipe


Here’s a link to an excellent video showing an ANSYS simulation of a closed-loop oscillating heat pipe (from YouTube Channel EasyMechLearn).

Advantages of oscillating heat pipe include the ability to work over longer distances than standard heat pipes as well as very good performance when working against gravity – when the condenser is below the evaporator. Some possible disadvantages include start-up issues and operating performance at low temperatures or low power. Further, heat-carrying capacity (Qmax) and power density are lower than for other two-phase devices because the inner diameter of oscillating heat pipes is determined by the viscosity and surface tension of the working fluid so the inner tube diameter is on the smaller side.

Rugged Electronics | Standards & Heat Pipe Solutions

Rugged Electronics | Standards & Heat Pipe Solutions

Rugged Electronics | Standards & Heat Pipe Solutions


This article provides a general overview of standards that target rugged electronics along with specific challenges and solutions faced by thermal engineers when designing for these applications, especially thermal solutions using two-phase devices: heat pipes and vapor chambers.

Whether for consumer, industrial, or military equipment, some electronic devices are designed specifically to operate in conditions considered harsh, rugged, or extreme. Fortunately, end-users and product engineers can reference a host of industry standards and test methodologies to more precisely define product requirements. Let’s start with one that every smartphone or Bluetooth speaker consumer is likely familiar with and move on to other industrial rugged enclosure standards before delving into MIL-STD for defense applications.


Ingress Protection (IP) Rating for Rugged Electronics

The IP Code, known also as ingress protection rating or international protection rating, classifies the degree of protection provided against the intrusion of objects (like hands, fingers, screwdrivers, wires, and even dust) as well as liquid intrusion into the device. It was developed by the International Electrotechnical Commission (IEC) under standard IEC-60529. The naming system and definitions are very straightforward.  An IP code is represented as 2-letters followed by 2-digits, as in IP67. To decode, just remember that the first digit represents the degree of protection from intrusion by a solid of a particular size while the second digit represents the degree of protection from liquid at various quantities and pressures.

Understanding IP Codes for Consumer and Industrial Electronics

IEC Ingress Protection (IP) Codes


NEMA, UL, and CSA Standards for Electronic Enclosures

The National Electrical Manufacturers Association (NEMA) is a US based trade association that publishes more than 700 standards for electrical products. One of these, NEMA-250, details electrical enclosure standards/tests for ingress of solids and liquids, aligning very closely with the IP Code, but goes further to include corrosion protection as well as the construction of the enclosure.

Rugged Electronics - NEMA Standards

NEMA Electrical Enclosure Standards. Source: NEMA


Aligning very closely with NEMA-250 are UL-50/50E from Underwriters Laboratories and CSA-C22.2 from the Canadian Standards Association. While IEC (IP Code) and NEMA do not test or certify products themselves (it’s up the manufacturer or third-party testing facilities), both UL and CSA require certification directly from them.


MIL-STD-810H and IEC-60068

The United States Military Standard for test methodology to determine the environmental effect on equipment is known as MIL-STD-810, with “H” as its latest revision designation (as of Mid-2020). In a nutshell, it’s a series of standards and test methods that define the ruggedness/durability of a device or piece of equipment. It should be noted that the same governing standards group which developed the IP Code, the IEC, also has international standards and testing procedures similar to MIL-810, as defined by IEC-60068. We won’t go into detail here, as the primary function of this section is to give the reader a solid overview of the variety of test methodologies for rugged electronic equipment in the defense sector (for which MIL-810 will suffice) and provide insight into how thermal engineers grapple with some of the problems.

Although 810H and other MIL standards are designed to facilitate a clear understanding of equipment capabilities between the Department of Defense and military contractors, it’s been increasingly adopted by buyers and manufacturers of industrial equipment.  For simplicity’s sake, we’ve divided each of the protection requirements and associated test methodologies into five board categories, with those in italics representing items directly applicable to the definition and testing of thermal assemblies designed to cool electronic components within a device. One note – rugged devices only need to meet those MIL-810 standards most applicable to its use and function.

MIL-STD-810G Standards Graphic

MIL-810 for Rugged Electronics


Rugged Electronics Protection from Exposure to Liquids / Solids

Whether the enclosure requirements are driven by IP Code, NEMA, UL, CSA, IEC or the MIL-810 standard above, decisions regarding enclosure location (indoor/outdoor), durability, and degree of ingress from solids and/or liquids are made early in the product design phase.  Combined with information about the location and total watts of power to be dissipated, these constraints give thermal engineers a good initial feel for what’s going to be required of the thermal solution.

Rugged Electronics – Enclosure Open to Ambient Air

If product designers have opted for an electronics enclosure design with at least some reasonable access to ambient air despite the case being exposed to humidity and salt fog, thermal engineers immediately know that corrosion of metal parts in the thermal assembly is going to be a problem. Solutions for the most used materials, copper and aluminum, include nickel plating and anodizing (for aluminum only).

 Additionally, if the rugged device is intended to be used in dusty or sandy environments, and in the absence of build in filters, engineers may opt for fin design with more space between them to help lessen debris buildup.

Lastly, they will have a good idea about the available air-flow into the case. The higher the air-flow, the smaller heat sink and depending on required power dissipation the less of a need for higher-performing two-phase devices like heat pipes (solid metal heat sinks may suffice).


Rugged Electronics – Sealed Enclosure

Example of a ruggedized computer system using heat pipes

Thermal Heat Sink Design of 7STARLAKE Rugged Computer – MIL-810 Compliant


If the case is completely sealed, ingress of liquids or solids is no longer a concern. However, thermal management of even moderately powerful components will likely require heat to be moved to the case enclosure and potentially spread across its wall(s) before it can be dissipated into the surrounding air – a natural convection solution is required. This may be done using heat pipe or vapor chamber thermal modules.

Let’s take an example of the thermal solution that’s in between the two scenarios above. The chassis is fan-less and non-vented although not completely sealed due to the I/O ports, however it is tested for dust resistance. As a result, thermal dissipation is through natural convection with heat being transferred to the device’s upper and lower enclosure walls.

While Celsia regularly designs thermal solutions for sealed enclosures, this was not one or our projects. It’s shown because of the wonderful graphic example from 7STARLAKE – an OEM, MIL-810, manufacturer of rugged computers.

Residing on the top side of the PCB are I/O functionality and the power source to which a copper heat spreader is attached. The spreader mates to two copper heat pipes embedded into the base of the upper heat sink lid. The CPU and chipset, located on the opposite side, are similarly attached to a copper spreader with heat pipes embedded in a lower heat sink lid, which doubles as the outer enclosure.

This example also serves as a good segue into temperature-related requirements for rugged electronics as it is designed to operate in environments from -40oC to +70oC (without throttling the 50-watt CPU/GPU).


Rugged Electronics Design for Atypical Temperature Ranges

 While consumer electronics like an iPhone are generally designed to operate reliably in temperatures between 0oC to +35oC, industrial devices are typically higher, and military grade electronics per MIL-810 are specified to handle between -33oC to +63oC while in operation under induced temperature conditions. At the lower end of this range, engineers have to ensure materials don’t become too brittle, parts don’t bind due to dissimilar rates of thermal contraction/expansion, and working fluids (fuel, coolant, lubricant) remain at the required viscosity, among dozens of other concerns. On the high end of the range, engineers are concerned with such things as gasket integrity, bearing and shafts becoming distorted, and a considerably shortened life of electronic components/circuitry.


Coping with High Temperatures (calculate the thermal budget)

After understanding the constraints and possibilities dictated by the enclosure requirements/design, thermal engineers next calculate if they have a large or small thermal budget with which to work. To calculate, subtract the maximum rated operating temperature of the device (Max Tambient) from the maximum allowable case temperature of the semiconductor (see IC specs), known as Max Tcase.


Available Thermal Budget = Max Tcase – Max Ambient

Heat Sink Delta-T Components


In order to stay within the thermal budget, the total temperature rise (Delta-T) from the heat source to the surrounding air, as illustrated in the image above, must be less than the available thermal budget. Rugged devices generating only a small amount of heat and/or low power densities watts/cm2) can likely be cooled by standard, traditional solid metal heat sinks.  As power increases and thermal budgets dip to between 20-40 oC heat pipes or vapor chambers are the likely solution. Budgets under 20 oC can probably only be achieved using pumped liquid cooling or thermoelectric devices.


 Coping with Low Temperatures

At first glance, it seems a bit silly to worry our electronics overheating at -20 oC or lower, especially given that heat pipes can withstand freeze-thaw cycles with no adverse effect (due to the tiny amount of working fluid). But, consider the following scenario. The device is powered on in sub-freezing temperatures and the integrated circuits quickly heat-up forcing the Tcase temperature to rise above freezing. As this happens some of the water in the heat pipe turns to vapor (at a low pressure) and moves toward the condenser (fin stack) where it’s cooled and returns to liquid. In very cold temperatures, the condenser end is still well below freezing, causing this liquid to freeze, thus preventing it from returning to the evaporator. As more vapor cools and freezes the evaporator dries out, causing the critical component (CPU, GPU, etc) to throttle way back (less processing power) or fail outright. Not the sort of thing you want during mission critical situations.

 The solution to this problem? A working fluid with a lower freezing temperature than water. Methanol is a good option but its ability to handle temperatures at the higher end of the scale is less than that of water. Solution – use one water-based and one methanol-based heat pipes, each able to carry the entire heat load.


Storage and Non-Operating Temperatures 

These variables are less important for solid metal thermal assemblies as well as for heat pipes or vapor chambers due to the small amount of working fluid. Potential problems arise with cooling solutions that use a relatively larger proportion of water in their systems – thermosiphons and pumped liquid systems. Thermosiphons for outdoor usage often use refrigerants and pumped liquid solution can use a small amount of anti-freeze, both of which will change the performance characteristics but can be designed around.


Rugged Electronics Protection from Shock, Vibrations, and Acceleration

The purpose of MIL-810 shock testing is to assess the system’s resilience to physical impact in handling, transportation and operation, while the goal of vibration testing is to determine its resilience to consistent shaking and juddering. Acceleration testing is performed to assure that the device can structurally withstand the steady-state inertia loads that are induced by acceleration, deceleration, and maneuver in the service environment, and function without degradation during and following exposure to these forces.


Methods to Survive Shock & Vibration Testing

Engineers tasked with having the thermal assembly withstand MIL-SPEC shock and vibration testing will likely look to reducing weight to as great a degree possible.

 Assume we have a thermal budget of 40oC in a forced convection environment as outlined in the image below and detailed in a recent blog. While the solid aluminum base looks attractive from a weight standpoint, having a  total heat sink delta-T of nearly 59 oC removes it from consideration. Keeping cost in mind, we find that the same heat sink with a copper base is within the thermal budget, but at a huge weight penalty (nearly double). By transitioning to a vapor chamber solution, we gain back all but a fraction of the weight gain although at a small cost premium. An added benefit comes from a substantially lower heat sink delta-T, which could be useful if hotter running heat sources are being considered.


Even with lightweight materials, the way in which the thermal module is attached to the enclosure or another component within the enclosure is critical. Heat sinks with higher power capacity, as represented above are going to require spring-loaded screws to adequately prevent damage from shock and vibration.


Two-Phase Thermal Design for Acceleration

Provided a solid metal heat sink is adequately attached, acceleration has little effect on performance. Not so with heat pipes.

Heat Pipe Orientation is Critical During Acceleration


As seen in the image above, acceleration (like gravity) reduces the capillary performance of the sintered wick if it is oriented in the wrong direction. In a static environment, heat pipes oriented vertically with the condenser directly below the evaporator are under 1G of load, causing the maximum power handing capacity (Qmax) of the heat pipe to be greatly reduced. An acceleration of 1G equates to a rate of change in velocity of around 22 mph for each second of elapsed time. In this scenario, the QMax of the heat pipe on the bottom of the illustration will be reduced by around 90% when it’s flipper the other way (like the top heat pipe). It’s critical that thermal engineers properly model both the level, duration, and acceleration frequency when designing two-phase heat sinks as infrequent, small bursts of short duration will have little if any effect, yet sustained acceleration can cause catastrophic failure if not properly designed.


Low Pressure (Altitude)

Increasing altitude reduces the surrounding pressure which causes the air to become less dense (fewer molecules per unit of volume). Less dense air is less effective at heat transfer than dense air so a thermal solution that performed adequately at lower elevations becomes increasingly strained.

Air Density & Temperature by Altitude


Increase Bulk Airflow Across the Heat Sink

In the case of forced convection solutions, one variable that can help alleviate reduced heat sink performance is to pass more air (CFM) across the fins of the heat sink. The amount of added airflow could easily double from sea level to 7,500 meters. However, this remedy used in isolation can create a large pressure drop in the fin spaces.


Increase Fin Gap

For applications where increasing airflow causes high pressure drops, effective operation at altitude may requires increasing the fin gap – the spacing between the fins. Even when done in conjunction with increased airflow, the solution now has less fin area so problems may persist.


Adding More Fin Area

This third variable can be optimized by increasing the XY dimensions or increasing fin height (Z direction). Each option has its own set of tradeoffs.

In closing, the challenges faced by thermal engineers tasked with cooling rugged electronics are many. Protection from liquid, dust, temperature swings and transportation mishaps are all things that need to be addressed during the product development process. Ruggedized standards and testing procedures provide the best communication vehicle for designers, manufacturers, and end-users.


Related Links